

Most teams sign up for asset software on a Monday, full of intent, and then stall by Wednesday. The account is created, a few assets are typed in, and the momentum quietly drains away because nobody is quite sure what the next concrete step should be. The tool is not the problem; the absence of a clear, ordered first hour is. A register that is half-built helps no one, and a half-built register is exactly what you get when setup has no plan you can point to and follow.
This guide fixes that. It walks through Find Asset in the order that actually works in practice, from the sign-up screen to the moment you scan your first label and watch the record confirm on your phone. Follow it end to end and a small organisation can be fully live in an afternoon; a larger one can have a solid foundation the same day and finish tagging over the following week. Nothing here needs a consultant, none of it needs hardware you do not already own, and every step leaves you with something usable rather than a pile of settings.
1. Create your account and set the basics
Start at the registration page and create your organisation. You will verify an email and a phone number, which matters more than it looks: those become the recovery and alert channels for the whole account, so use a work address and a number someone actually monitors, not a personal line that changes when a staff member leaves. Once inside, set your organisation name, your currency, and your timezone before you do anything else, because every value you record afterwards quietly inherits those settings and copies them onto every future asset.
Currency and timezone are easy to skip and annoying to correct later. If you are in Accra, set the currency to GHS and the timezone to GMT so that purchase values and audit timestamps read correctly from day one. Getting this right now saves you re-checking hundreds of records when a report looks an hour off or a cost looks ten times too large. It is a two-minute decision that either sits invisibly in the background for years, or becomes a nagging clean-up job you keep postponing because it touches everything.
2. Build the structure before the assets
The instinct is to start adding laptops immediately. Resist it for twenty minutes. Assets need somewhere to live, and if you create locations and departments first, every asset you add afterwards drops into a tidy structure instead of a flat, unsearchable list. Think of it as laying the shelves before you unpack the boxes: the effort feels like a detour, but it is the thing that lets you find any single item later without scrolling through a thousand undifferentiated rows hunting for one printer.
Keep the hierarchy shallow and honest. A branch, then a floor or room, is usually enough; resist inventing five levels of nesting you will never maintain. The same applies to categories — IT equipment, furniture, vehicles, tools. A handful of clear buckets beats forty precise ones that staff guess at inconsistently, because a structure only helps if people can place an item in it the same way twice. If you are unsure how a register should be shaped, our guide on how to build a proper fixed asset register is worth ten minutes before you commit.
3. Get your assets in — import, do not retype
If you already track equipment in a spreadsheet, do not retype it. Find Asset imports directly from a spreadsheet, and a clean import of two hundred rows takes minutes where manual entry would take a day and introduce typos on every tenth line. Spend your effort on tidying the sheet first: one row per asset, consistent column headers, and a single format for dates and values. The preparation is where the quality comes from; the import itself is almost boringly quick once the file underneath it is honest and clean.
Match your columns to the fields on import — name, category, location, serial number, purchase date, value — and fix the obvious rubbish before you upload, not after. Blank custodians and duplicated serial numbers are far easier to spot in a spreadsheet than inside the system, where they hide among thousands of records and only surface when a report refuses to reconcile. Our walkthrough on how to import assets from a spreadsheet covers the column mapping in detail.
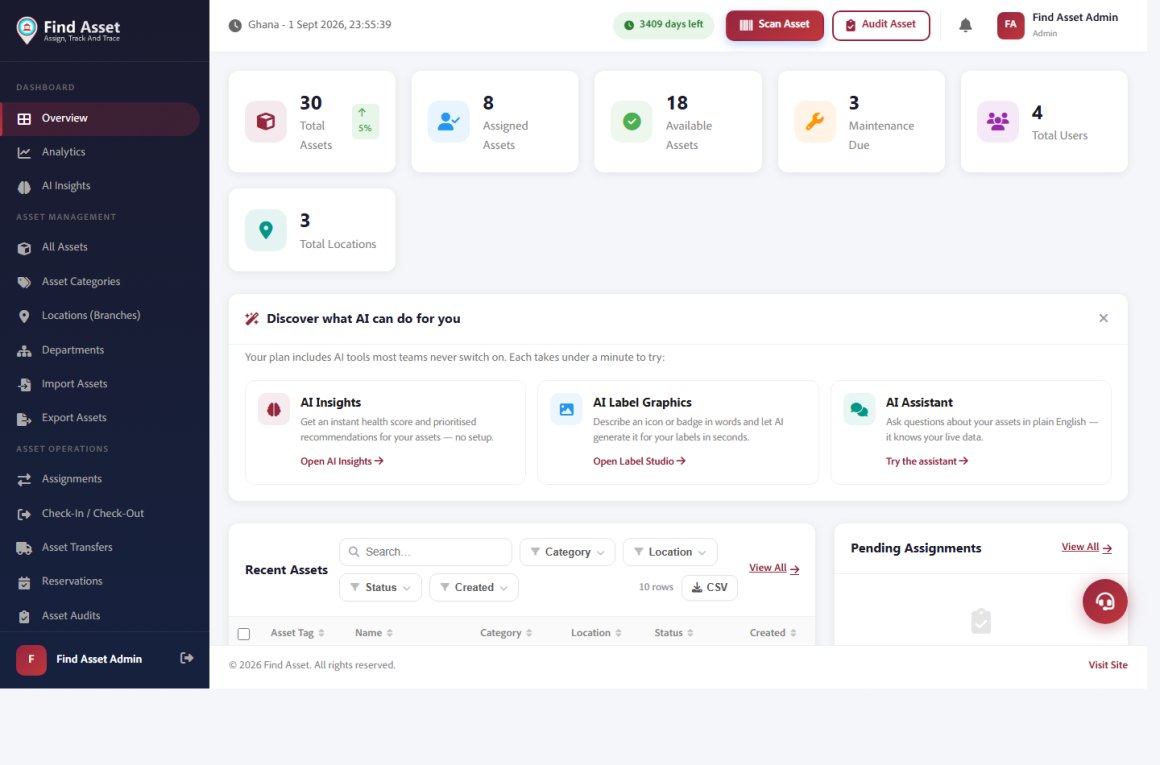
Once your assets are in, this is the first screen your team sees each day. The Find Asset dashboard rolls the whole register up into totals you can act on — how many assets are available, assigned or due for maintenance, and how many users and locations you have — with one-tap actions to scan or audit an item. You are not hunting through tabs; the shape of everything is on the home screen.
4. Assign a named custodian to every asset
An asset that belongs to "Finance" belongs to no one in particular. When something goes missing, a department cannot answer questions; a person can. As you import or review each record, attach a named custodian — the individual actually responsible for that item today, not the head of the team it nominally sits under. This single habit does more for accountability than any other field in the system, because it converts a vague collective shrug into a specific person you can simply walk over to and ask.
There is a quiet cultural benefit too. Once people know their name is attached to a laptop or a power tool, they treat it differently, because the item is visibly theirs to answer for rather than the organisation's to lose. Custodianship is not about blame; it is about clarity. When the register can always tell you who holds what, every conversation about a missing or damaged item starts from fact instead of guesswork, and disputes shrink from meetings into a thirty-second lookup on a phone.
What a well-kept register looks like
- Every asset has exactly one current custodian, recorded by name, not by team.
- Transfers are logged in the system, so the history shows every person who has held the item.
- When someone leaves, their assets are reassigned before their last day, not discovered missing months later.
- Custodians can see the list of what they hold, which quietly encourages them to look after it.
5. Add your users and set their roles
Find Asset is built around roles, and setting them correctly early prevents both frustration and mistakes. A store clerk doing daily scans does not need the same access as an administrator who can delete records or change billing. Invite your team, give each person the narrowest role that lets them do their job, and reserve full administrative rights for one or two trusted people. The goal is not to lock colleagues out; it is to make sure the buttons in front of anyone match the responsibilities they actually carry.
This is not bureaucracy for its own sake. Tight roles mean an accidental bulk deletion simply cannot happen at the counter, and they keep your audit trail meaningful because every change is tied to a real person with a real permission level. When something looks wrong later, you want the history to name a person and a time, not a shared login that could have been anyone. If you are configuring a larger team, our guide on setting up users, roles and permissions lays out sensible defaults.
6. Design and print your first labels
A record without a physical tag is only half a system. The label is what turns a database entry into something a phone can find in three seconds. Find Asset includes a label designer, so you can lay out a clean tag with your organisation name, the asset code, and a scannable barcode or QR code, then print a run of them to a standard or Zebra printer. The tag is the bridge between the neat data on your screen and the messy reality of a store room, and without it the two drift apart.
Keep the first design plain: an asset code, one barcode, and enough white space that the scan is reliable. Fancy layouts come later, once you know the tags survive the environment they live in. Match the tag size to the item — a small QR code for laptops and instruments, a wider 1D barcode for shelving and larger equipment. If you are weighing which symbology to print, our note on choosing between QR codes and 1D barcodes will save you a reprint.
7. Make your first scan
This is the moment the system becomes real. Stick a printed label on an asset, open Find Asset on your phone, and scan it. The record appears instantly — name, location, custodian, history — and you can update its status or location on the spot. Do this once and the whole point clicks into place: the register is now something you check by pointing a camera, not something you reconcile against reality once a year in a stressful, error-prone marathon that everyone secretly dreads and quietly delays.
From here, the work is simply repetition. Tag the rest of your equipment room by room, scanning each item as you go so the label and the record are confirmed together in a single motion rather than in two disconnected steps. A two-person team can tag several hundred assets in a day at a steady pace, and every scan makes the next audit faster because the item has already proven, once, that it exists exactly where the register claims it does.
Your first-week checklist
Setup is not a single event so much as a short sequence, and it helps to see the whole arc at once rather than discovering each step only when you trip over it. The table below is the order this guide follows, with a realistic sense of effort and why each step earns its place. Read it as a map, not a stopwatch: the times are honest estimates for a small team, and the point is the sequence rather than any exact minute count.
| Step | Typical effort | Why it matters |
|---|---|---|
| Account, currency, timezone | 10 minutes | Every record inherits these settings; fixing them later is painful. |
| Locations and categories | 20-30 minutes | Gives assets a structure to drop into instead of a flat list. |
| Spreadsheet import | 1-2 hours | Loads hundreds of assets in minutes and avoids typing errors. |
| Custodian assignment | Ongoing during import | Turns "someone" into a named, accountable person. |
| Users and roles | 20 minutes | Protects data and keeps the audit trail meaningful. |
| Design and print labels | 1 hour plus printing | Makes each asset physically scannable. |
| First scans and tagging | Rest of the week | Confirms records against reality and readies you for audits. |
None of these steps is technically hard, and none depends on the one before being perfect. You can start scanning before the last department is imported, and you can refine categories after the first week once you see how staff actually search. The point is momentum: each step leaves you with something usable rather than a half-finished configuration that quietly gets abandoned. A register that is live and slightly imperfect beats a flawless plan that never leaves the whiteboard, every single time.
Bringing it together
Notice that almost none of this is about the software itself. It is about giving every item a permanent identity, a home, a named owner, and a scannable tag — then keeping those facts current by scanning at the point where things actually happen. The system is just what makes those habits cheap enough to sustain week after week. Get the first afternoon right and the rest is repetition, not reinvention, which is precisely why so many teams find the second month easier than the first hour.
Find Asset exists to carry exactly that routine, from the first import to the hundredth scan. If you are ready to move from a spreadsheet you no longer trust to a register you can point a camera at, start a free 14-day trial and work through the steps above at your own pace. For the wider context, the background on asset tracking is a useful primer on why these habits matter and how they compound over time.