
Most asset registers fail at the last centimetre. The database is tidy, the categories are sensible, the depreciation schedules balance, and then someone walks into a store room and finds a shelf of laptops wearing handwritten stickers, faded thermal receipts, and one label printed sideways that no scanner will ever read. The data was never the problem. The physical tag was.
Designing a label that survives a warehouse, scans on the first pass, and carries the right information has traditionally meant wrestling with clunky manufacturer software, obscure template files, or a graphic designer who does not understand barcodes. Designer Studio exists to remove that friction. It is a visual, drag-and-drop label editor built into Find Asset that lets anyone design a clean, standards-compliant asset label and print hundreds of them straight from your live asset data.
What Designer Studio actually is
Designer Studio is a WYSIWYG canvas. You choose a label size, drag on the elements you need, position them, and see exactly what will print. There is no code to learn and no separate design tool to install. Behind the friendly canvas it generates ZPL, the printer language that industrial label printers such as the Zebra ZD421 speak natively, so what you see on screen is what fuses onto the label.
Crucially, the elements on the canvas are not static pictures. They are bound to fields in your asset record. A barcode object points at the asset tag; a text object points at the asset name, category, or custodian. When you print, Studio pulls the real value for each asset and stamps it in. Design once, print for your entire fleet, and never again retype a tag number that a colleague could fat-finger into a mismatch between the sticker and the system.
The building blocks of a good label
A label is a small space, and clutter is the enemy of a fast scan. Designer Studio gives you a focused set of objects, each with a job to do. Understanding what belongs on the label, and what should stay in the database, is half the battle. The goal is not to show everything you know about an asset, but to carry the smallest set of marks that let a person or a scanner resolve the tag to its full record in a single, confident motion.
What belongs on a scannable asset label
- A machine-readable code (1D barcode or 2D QR) bound to the permanent asset tag.
- The human-readable tag number printed underneath, so a person can key it in if a scan fails.
- One or two identifying lines: asset name or category, and optionally the owning department.
- Your organisation name or a small logo, so found items can be returned.
- Generous quiet zones and nothing crammed against the edges.
Notice what is not on that list: purchase price, serial numbers of internal components, warranty dates, and the like. Those live in the record and appear the moment someone scans. A label that tries to be a datasheet becomes unreadable at arm's length, and it ages badly too, because the instant a warranty lapses or a custodian changes the printed detail is wrong while the tag it is stuck to has years of service left in it.
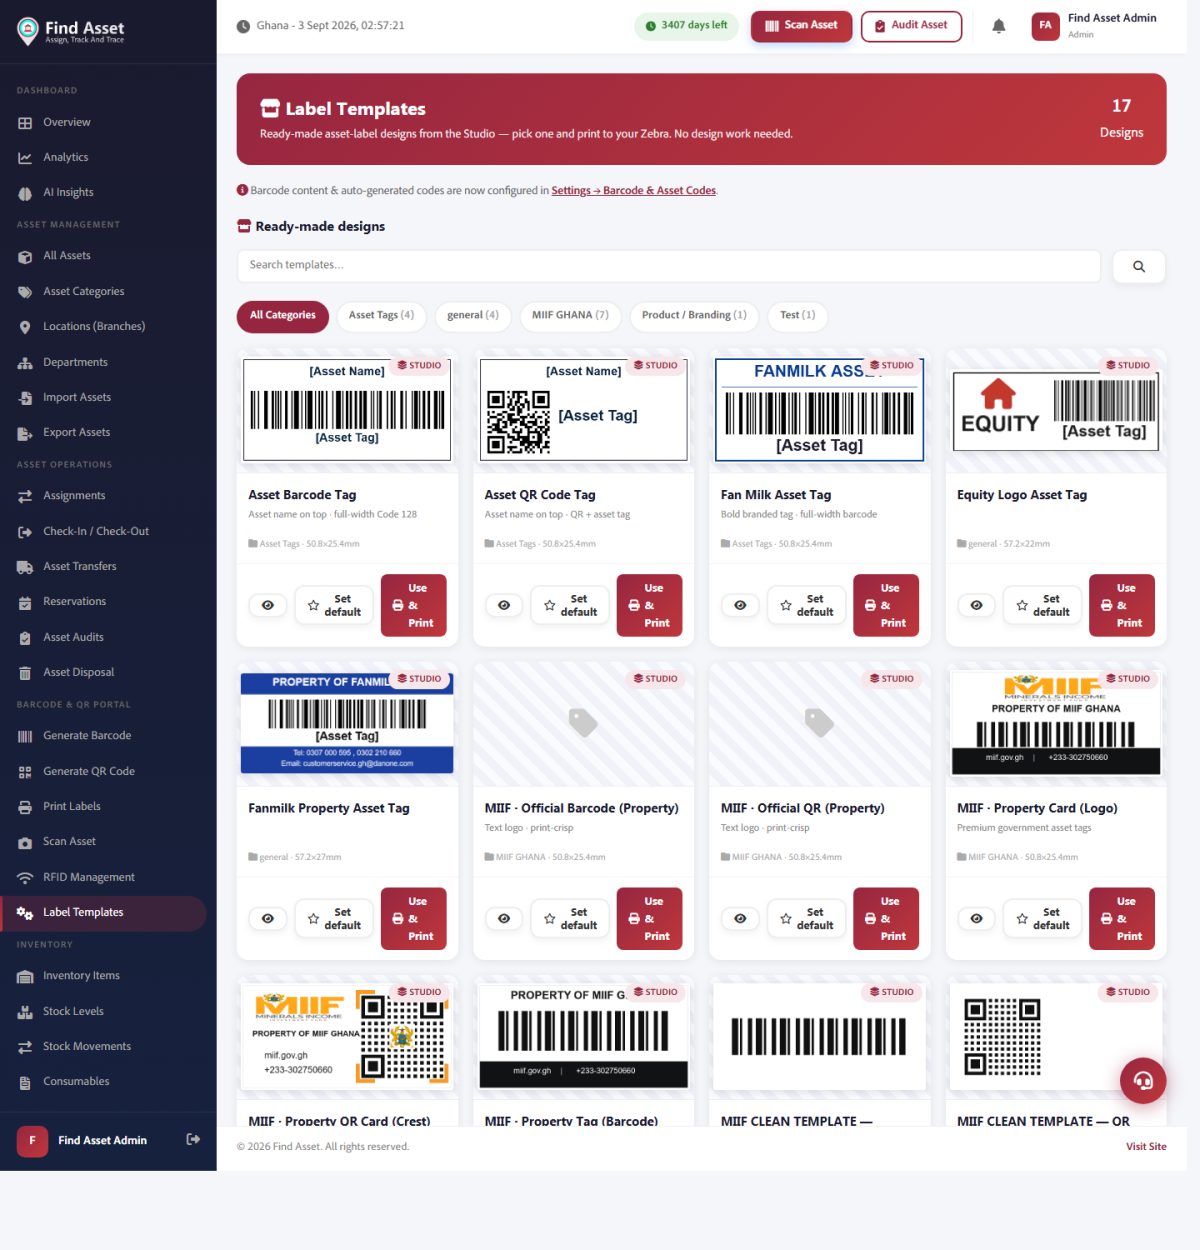
The screenshot above is Find Asset's Label Templates gallery: a set of ready-made asset-tag layouts you can filter, preview and send straight to a Zebra printer. It is the quickest way to get a professional tag on an asset without opening a design tool at all.
Barcode or QR: choosing the code
Designer Studio supports both linear barcodes and QR codes, and the right choice depends on your assets and your scanners. A 1D Code 128 barcode is compact, scans quickly with a laser wedge, and suits larger equipment where you have room for a horizontal strip. A QR code holds far more data in a smaller footprint, tolerates partial damage, and scans from any angle with a phone camera, which matters when your field team uses their own handsets rather than dedicated scanners.
For most Ghanaian organisations rolling out mobile-first tracking, QR wins on flexibility, but there is no single correct answer. Our comparison of QR codes versus 1D barcodes for asset tags walks through the trade-offs with real examples. Whichever you pick, Studio binds the code to your asset tag, so scanning always resolves to the correct record, and you keep the freedom to run one symbology as the house default while reserving the other for the odd asset class that genuinely needs it.
Sizing the label to the asset
One template rarely fits everything. A 50.8 by 25.4 millimetre label sits neatly on a laptop lid or a monitor bezel, while a small 25 by 15 millimetre tag suits phones, tools, and lab instruments. Fixed plant and vehicles can take a larger, more durable plate. Designer Studio lets you save multiple templates and reuse them, so your team is not redesigning from scratch every time the asset class changes, and everyone prints from the same approved layouts rather than improvising a fresh one under deadline pressure.
| Asset type | Suggested label size | Recommended code | Why |
|---|---|---|---|
| Laptops, monitors, IT kit | 50.8 x 25.4 mm | QR or 1D | Flat surface, easy to scan at the desk |
| Phones, tools, small instruments | 25 x 15 mm | QR | Tiny footprint, still scannable from a camera |
| Furniture and fixtures | 38 x 19 mm | 1D barcode | Durable adhesive, quick laser scanning |
| Vehicles and heavy plant | Metal or laminate plate | QR | Survives weather, dirt, and abrasion |
Matching the tag to the surface it lives on is one of the most overlooked steps in a rollout, and it is where many first attempts go wrong. If you are still deciding on materials and adhesives, our guide on how to choose asset tags covers the practical durability questions. A tag chosen for a cool office shelf will not survive the heat, oil and vibration of a plant room, so the surface should decide the stock long before anyone opens the design canvas.
Printing hundreds from one design
The real payoff arrives at print time. Because every object is bound to a field, you do not design a label per asset; you design a template per asset class and let Studio merge the data. Select the assets you want, choose the template, and send the batch to the printer. A store of two hundred newly received laptops goes from unlabelled to fully tagged in a single run, in register order, so whoever applies them can walk the shelf without hunting for the matching sticker.
Studio outputs native ZPL, so an industrial thermal printer handles the volume without the smearing and misalignment you get from dragging labels through an office inkjet. If you are planning a large tagging exercise, the mechanics of merge printing are worth understanding in detail before you start, because the decisions you make once about sequence, padding and media size are the ones that either save or cost you an afternoon when the run is four hundred labels rather than four.
Designing for the scan, not the eye
A label that looks handsome on screen can still fail in the field if the design ignores how scanners work. Keep a clear quiet zone around every barcode, never stretch a code to fill space, and hold the printed size above the minimum your symbology needs. High contrast matters too: true black on white, not grey on cream. Designer Studio nudges you towards these defaults, but the judgement is yours, and the moments where you are tempted to override a sensible default for the sake of appearance are exactly the moments to resist.
Placement is the other half. A tag hidden under a laptop or wrapped around a curved handle will not scan reliably. Put labels on flat, visible, consistent locations so your team knows where to look without hunting. Small habits like these are the difference between an audit that flies and one that stalls, and our notes on designing a clean Zebra label go deeper on the specifics that keep a whole batch reading first time.
Where Designer Studio fits in your workflow
Studio is not a standalone toy; it is the physical layer of your asset register. You import or create your assets, give each one a permanent tag, design a template, print, and stick. From that moment every scan updates the live record, logs the location, and confirms the custodian. The label is the bridge between the database and the shelf, and it is only as good as the design that produced it, which is why treating label design as a first-class part of the register pays off long after the initial rollout.
For teams that follow open management standards, this closes a genuine gap. Frameworks such as ISO 55000 stress reliable identification of assets throughout their life, and a durable, scannable, consistently designed label is the most basic form that identification can take. Without it, the finest policy document in the world describes assets nobody can actually point a scanner at, and the register slowly drifts away from the reality on the floor.
Bringing it together
Designer Studio is not really about making pretty stickers. It is about closing the last centimetre between a clean database and a physical world that has always resisted being counted. When every asset carries a well-designed, machine-readable tag bound to a single permanent record, the whole discipline of tracking gets easier: audits go faster, transfers are logged, and nothing disappears into the fog of handwritten labels.
That is exactly what Find Asset and Designer Studio were built to deliver, from a single laptop tag to a warehouse-scale batch print. If you are ready to design your first label and see it merge across your whole fleet, start a free 14-day trial and print a real tag within the hour.